
Let's start!
1. How to Create a New Document and Set Up a Grid
Press Control-N to make a New Document. Set the Units to Pixels, and enter 800 x 600 for the width and height of the document. Then in the Advanced options, select RGB, Screen (72 ppi), and make sure to activate the Align New Objects to Pixel Grid box before clicking OK.
Activate the Grid (View > Show Grid) and Snap to Grid (View > Snap to Grid). You'll need a grid every 10 px, so simply press Control-K to go to Preferences, and in Guides & Grid set Gridline every to 10 and Subdivisions to 4. Don't worry—the grid will help you work in an easy way, and it can also be enabled or disabled by pressing the keyboard shortcut Control-".
You can activate the Info panel (Window > Info) in order to have a preview of the size and position of your shapes. Remember to set the measuring unit to Pixels from Edit > Preferences > Units. This will greatly increase the speed of your work.

2. How to Create the Headphones
First things first—let’s start with one earpad so we can duplicate it and then create the headband for our headphones. Make sure to turn on the Grid so that you can work with greater precision and ease.
Step 1
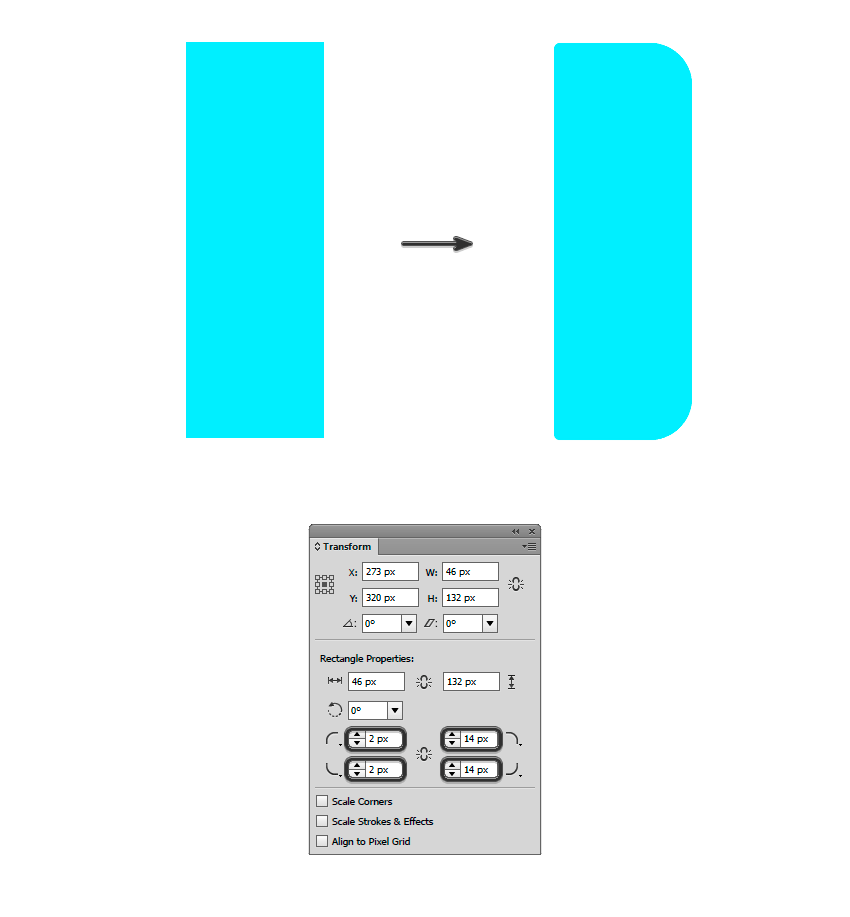
Start by creating the earpad with a 46 x 132 px rectangle using the Rectangle Tool (M). Select
#84EDFF as the fill color and no color for the stroke fill.
In the Transform panel, enter 14 px as the right-side corner radius and 2 px as the left-side corner radius.
Step 2
Duplicate the rectangle (Control-C > Control-F) and change its Width to 36 px with the Selection Tool (V). Select
#40BDD1 as the fill color and change the right-side corner radius to 10 px.
Step 3
Duplicate the last rectangle (Control-C > Control-F) and change its Width to 24 px. Select
#47D2E9 as the fill color and change the left-side corner radius to 6 px.
Step 4
Next to the earpad, create the speaker base using a 4 x 128 px rectangle, and use
#5B5B5F as the fill color; then set the right-side corner radius to 2 px.
Step 5
Now create the housing using a 24 x 80 px rectangle. Select
#363434 as the fill color and change the left-side corner radius to 2 px. 
Step 6
Add some depth to the housing duplicating (Control-C > Control-F) the previous rectangle and changing its Height to 58 px. Change the fill color to
#3B3939.
Step 7
Repeat the previous step and change the rectangle’s Height to 50 px. Change the fill color to
#444242.
Step 8
Now create the support for the speaker’s hinge using a 20 x 16 px rectangle. Select
#4D4A4A as the fill color and change the left side radius to 8 px.
Duplicate the rectangle (Control-C > Control-F) and move 2 px downwards using the arrow of your keyboard. Change the fill color to
#3B3B3B and send it backwards (Object > Arrange > Send Backward).
Step 9
Create a 8 x 42 px rectangle for the small headband on the speaker/housing. Set the lower corner radius to 4 px and select
#5B5B5F as the fill color.
Duplicate it (Control-C > Control-F) and change the fill color to
#3B3B3B. Move the rectangle downwards 2 px, and send it backwards (Object > Arrange > Send Backward).
Step 10
Continue with the small headband using a 8 x 10 px rectangle. Select
#444242 as the fill color and place the rectangle as shown in the image below.
Step 11
Now create a hinge using a 16 x 16 px ellipse with the Ellipse Tool (L). Select
#5B5B5F as the fill color and place the ellipse as shown in the image below.
Duplicate the ellipse and change its size to 12 x 12 px from the Transform panel. Change the fill color to
#444242.
Step 12
Continue drawing the headband’s support using a 16 x 18 px rectangle. Change the fill color to
#444242. Select chamfer corners for the lower corners and set the radius to 4 px. Send the rectangle to the back (Object > Arrange > Send to Back).
Step 13
Create a new 12 x 20 px rectangle, and select
#5B5B5F as the fill color. Set the lower corner's radius to 6 px.
Duplicate (Control-C > Control-F) the rectangle and change the fill color to
#3B3B3B. Send it backwards (Object > Arrange > Send to Back) and move it downwards 2 px.
Step 14
Create two rectangles, one of 4 x 26 px (
#D8D9DD) for the headband strap, and another one of 12 x 20 px(#5B5B5F) as the strap support.
Duplicate the first rectangle (Control-C > Control-F) and change its Height to 2 px. Change the fill color to
#AEADB3.
Select everything and group it together (Control-G).

Step 15
Now, we’ll draw our headphones headband. Let’s begin by creating a 252 x 252 px ellipse and selecting 20 px as the stroke width. Select
#84EDFF as the stroke color and delete the ellipse’s lower anchor point with the Direct Selection Tool (A).
Expand the stroke (Object > Expand...) and then slightly round the headband’s lower edges with the Direct Selection Tool (A).

Step 16
Duplicate the headband (Control-C > Control-F). Set the scale to 93% (Object > Transform > Scale..). Use
#47D2E9 as the fill color.
Move the duplicated headband 6 px downwards, and then select both headbands and remove the lower remaining part with the Shape Builder Tool (Shift-M).

Step 17
We are about to finish the headphones!
Now select the left speaker, duplicate it (Control-C > Control-F) and reflect it vertically (Object > Transform > Reflect...). Put it just on the right side of the headband.

3. How to Create a Plug Cord
Now that we have finished the headphones, it's time to draw the plug cord. Moving on!
Step 1
Let’s start with the cable entry in the right speaker. Draw it using a 14 x 20 px rectangle, and select
#2B2A2A as the fill color.
Add another 8 x 16 px rectangle for the cable connector. Use
#545252 as the fill color.
Step 2
Now, draw the cable with the Pen Tool (P), using 4 px as the stroke thickness. Use
#47D2E9 as the stroke color.
Round all corners with the Direct Selection Tool (A). Then expand the stroke shape (Object > Expand...) and press OK.
Turn off Snap to Grid for a moment (Shift-Control-") to align the cable with the connector.

Step 3
Let’s draw the jack using a 8 x 22 px rectangle and
#545252 as the fill color. Add another 2 x 8 px rectangle (#8A8686).
Add a third rectangle, this one of (
#B4B5B8) 4 x 20 px, and set 2 px chamfers in the upper corners from the Transform panel.
Finally, add two 4 x2 px rectangles (
#8A8686) and place them over the jack.
4. How to Create a Background
And we are done with the plug cord, so now let’s finish the design by creating a nice background for our headphones.
Step 1
Let’s start by creating a musical note. To do this, use a 22 x 12 px rectangle, a 4 x 40 px rectangle and finally a 20 x 20 px ellipse. Use
#003E57 as the fill color.
Link all forms and merge them together using the Unite button from the Pathfinder panel. Slightly round all corners with the Direct Selection Tool (A).

Step 2
Duplicate (Control-C > Control-F) the musical note four times, and rotate the copies and change their scales using the Selection Tool (V). Place them as shown in the picture below.
Then group them together and flip them vertically (Object > Transform > Reflect...) to place them on the right side of the headphone.

Step 3
Finally, create an 800 x 600 px rectangle, the same size as the canvas. Apply a radial gradient from the Gradient panel, using the following fill colors:
- Color A:
#1F3B54 - Color B:
#182D40
Remember to send the rectangle to the back of the canvas (right click > Arrange > Send to Back).


No comments:
Post a Comment